Introduction
In the previous article of this series, we trained and tested our YOLOv5 model for face mask detection. In this one, we’ll convert our model to TensorFlow Lite format.
I previously mentioned that we’ll be using some scripts that are still not available in the official Ultralytics repo (clone this) to make our life easier. To perform the transformation, we’ll use the tf.py script, which simplifies the PyTorch to TFLite conversion. Otherwise, we’d need to stick to the Ultralytics-suggested method that involves converting PyTorch to ONNX to TensorFlow to TFLite. Note that the last operation can fail, which is really frustrating.
To perform the conversion, run this:
import tensorflow as tf
print(tf.__version__)
!PYTHONPATH=. python3 /content/yolov5/models/tf.py --weight
/content/yolov5/runs/train/exp2/weights/best.pt --cfg models/yolov5s.yaml --img 416 --source /content/FaceMaskDataset/images/train
When passing the weights’ file path (the configuration.yaml file), indicate the image dimensions the model accepts and the source of the training dataset (the last parameter is optional). The script will use TensorFlow 2.3.1 to transform the .pt weights to the TensorFlow format and the output will be saved at /content/yolov5/runs/train/exp/weights.
Ultralytics-Suggested Method for Weights Conversion
From my perspective, this step is a bit cumbersome, but it’s necessary to show how it works. Instead of running the previous commands, run these lines:
# Uncomment all this if you want to follow the long path
#!pip install onnx>=1.7.0 # for ONNX export
#!pip install coremltools==4.0 # for CoreML export
#!python models/export.py --weights /content/yolov5/runs/train/exp2/weights/best.pt --img 416 --batch 1 # export at 640x640 with batch size 1

#!pip install tensorflow-addons
#!pip install onnx-tf
#!pip install tensorflow==2.3.0

#import tensorflow_addons as tfa
#import onnx
#from onnx_tf.backend import prepare
#import tensorflow as tf
#print(tf.__version__)

#base_model = onnx.load('/content/yolov5/runs/train/exp2/weights/best.onnx')
#to_tf = prepare(base_model)
#to_tf.export_graph("/content/yolov5/runs/train/exp2/weights/customyolov5")

#converter = tf.compat.v1.lite.TFLiteConverter.from_saved_model('/content/yolov5/runs/train/exp2/weights/customyolov5')
#tflite_model = converter.convert() #just FYI: this step could go wrong and your notebook instance could crash.
Testing TFLite Weights on Google Colab
Now it’s time to check if the weights conversion went well. Before doing so, we need to slightly modify the detect.py script and set the proper class names. Open up the file (/content/yolov5/detect.py), look for names = [...] on line 157 and change it to names = ['Face mask','No face mask']. Save and close the file.
If everything went well, you should be able to load and test what you've obtained. Run the lines below. They will load the YOLOv5 model with the .tflite weights and run detection on the images stored at /test_images.
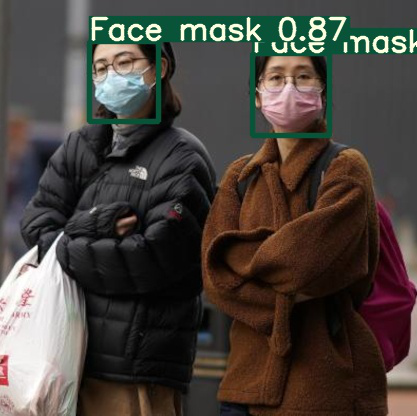
!python detect.py --weight /content/yolov5/runs/train/exp2/weights/best-fp16.tflite --img 416 --source ../test_imagesIf all goes well, the result will be similar to this:
And with that, you're done — at least in this Notebook! As a last step, download the weights file stored at /content/yolov5/runs/train/exp/weights/best-fp16.tflite and best.pt to use them in the real-world implementation.
TFLite Interpreter for Good Performance on Edge Devices
The YOLOv5’s detect.py script uses a regular TensorFlow library to interpret TensorFlow models, including the TFLite formatted ones. In our scenario, TensorFlow is too heavy and resource-demanding to be run on small devices. If you want to maintain good performance of detections, better stick to TFLite and its interpreter. I’ve essentially replaced all TensorFlow-related operations with their TFLite equivalents. In addition, I made some small changes to make the detector able to run on TPU/GPU: I copied the detect.py file, modified it, and saved it as detect4pi.py. You can find the file here. I invite you to compare these files to fully understand the modifications.
Testing the YOLOv5 Model Weights Locally
This step is optional but recommended. In this short test, I’ll show you how to feed your computer’s webcam output to the detector before the final deployment on Pi. I’ll also show you how to test the model with and without the TFLite interpreter. Once you’ve got the modified detect4pi.py file, create a folder on your local computer with the name Face Mask Detection.
Get the latest PyTorch version and its dependencies by running pip3 install torch torchvision from any CLI window.
Launch a Jupyter Notebook from the directory you’ve created: open the CLI, navigate to that folder, and issue the jupyter notebook command. Once the notebook pops up, run the following cells:
#Install the appropriate tensorflow version
!pip install tensorflow==2.3.1
import torch #It's required by YOLO
import tensorflow as tf
!git clone https://github.com/zldrobit/yolov5 #comment this if this is not your first run
%cd yolov5
!git checkout tf-android
print(tf.__version__)

#Install all dependencies indicated at requirements.txt file
#Prompt if any GPU is available
!pip install -r requirements.txt
print('All set. Using PyTorch version %s with %s' % (torch.__version__, torch.cuda.get_device_properties(0) if torch.cuda.is_available() else 'CPU'))
Before continuing, remember to modify names list at line 157 in the detect.py file and copy all the downloaded weights into the /weights folder within the YOLOv5 folder.
To feed your YOLOv5 model with the computer’s webcam, run this command in a new notebook cell:
!python detect.py --weights weights/best.pt --img 416 --conf 0.4 --source 0 --classes 0 1
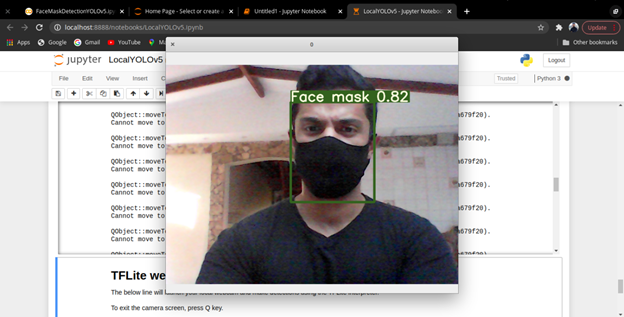
It will initiate the webcam in a separate window, identify your face, and detect if you’re wearing a face mask or not. This is what you should expect: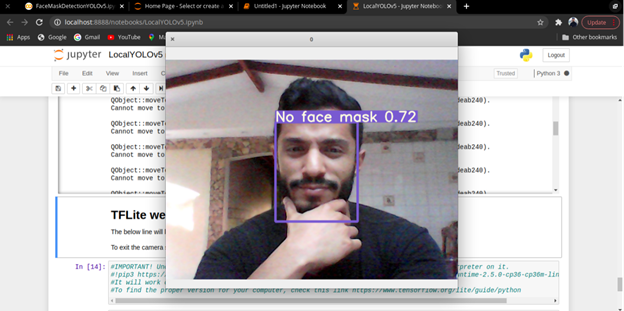
If you want to test the model with its TFLite weights, you first need to install the corresponding interpreter on your machine.
If you’re using linux x86_64:
pip3 https://github.com/google-coral/pycoral/releases/download/release-frogfish/tflite_runtime-2.5.0-cp36-cp36m-linux_x86_64.whl
If you’re using any other OS, I would suggest you check the best version for you.
Now you can run the next cell and expect exactly the same result as before:
!python detect4pi.py --weights weights/best-fp16.tflite --img 416 --conf 0.45 --source 0 --classes 0 1
Next Step
We’ve trained and tested the YOLOv5 face mask detector. In the next article, we’ll deploy it on Raspberry Pi as promised. Stay tuned!